






The Control Panel is a web portal and can be accessed via the address https://panel.medAspis.org. The Control Panel logs all FMD operations that have been recorded and processed in the medAspis Lean FMD System.
The Scan History is always displayed as the home screen. Other menu items include the Scan Archive and, optionally, Groupings and Alert Guard. The settings relate to the registered medAspis Speed Scanners, access to the NMVS and user management for the medAspis Speed Scanners.
In addition, in the top right-hand corner, under ‘myAccount’, you’ll find settings for your own account and the option to log out of the system.
Das Control Panel hat eine Menüleiste auf der linken Seite. Mit Klick auf die drei Balken oben links kann das Menü aufgeklappt werden.
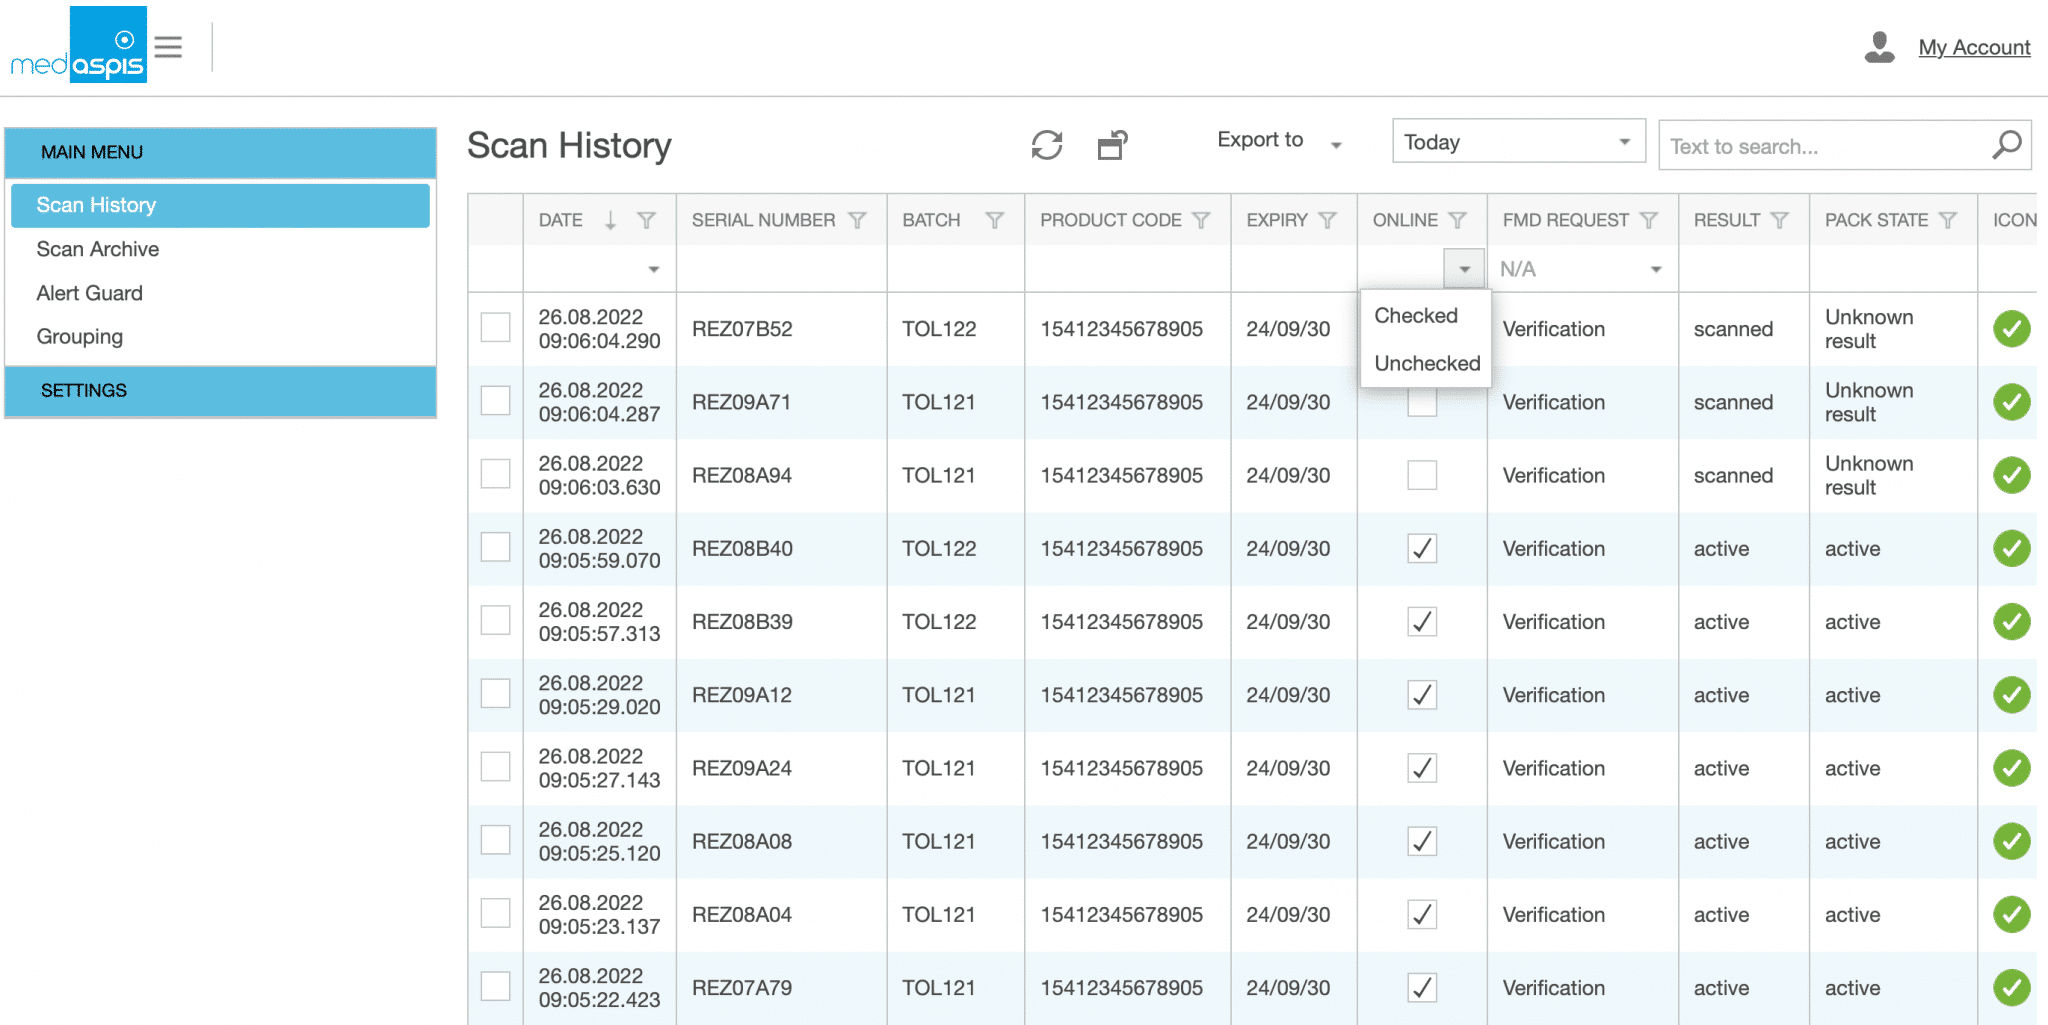
The Scan History displays all data records captured using the medAspis Speed Scanners and the corresponding NMVS results. The data is stored permanently. It is not possible to alter or tamper with the data.
For each scan, the timestamp, the pack details (product code, serial number, batch number, expiry date), the online status and the FMD result – including the current pack status – are displayed. Each entry is displayed with the same icon that was previously shown in the medAspis Speed Scanner. If the operator presses the confirmation button following a negative result, this is also logged in the scan history.
More information is available for each data record than is shown in the default view of the Scan History. Values displayed in the standard view are marked with an ‘x’:
The timestamp is the time recorded by the medAspis Lean FMD system. The timestamps from the medAspis Speed Scanners are not logged.
After 40 days, the entries in the Scan History are moved to the Scan History Archive for performance reasons. The Scan Archive has the same functionality as the Scan History.
There are two icons for managing the Scan History and all other views:
Clicking this icon will reload the contents of a table. This function is useful if new data has been generated in the meantime using a scanner and has not yet been displayed.
The view of tables can be changed manually. Clicking this icon will reset all tables to their original view.
If a medAspis Speed Scanner does not have a direct internet connection whilst in operation, the data for that period is temporarily stored in the medAspis Speed Scanner and uploaded to the Lean FMD system as soon as the internet connection is re-established.
The data is displayed in the scan history and marked as offline (not online).
The Scan History always starts with the default filter ‘Today’, so only scans from the same day are displayed. If no scans have been carried out on that day, the list will be empty.
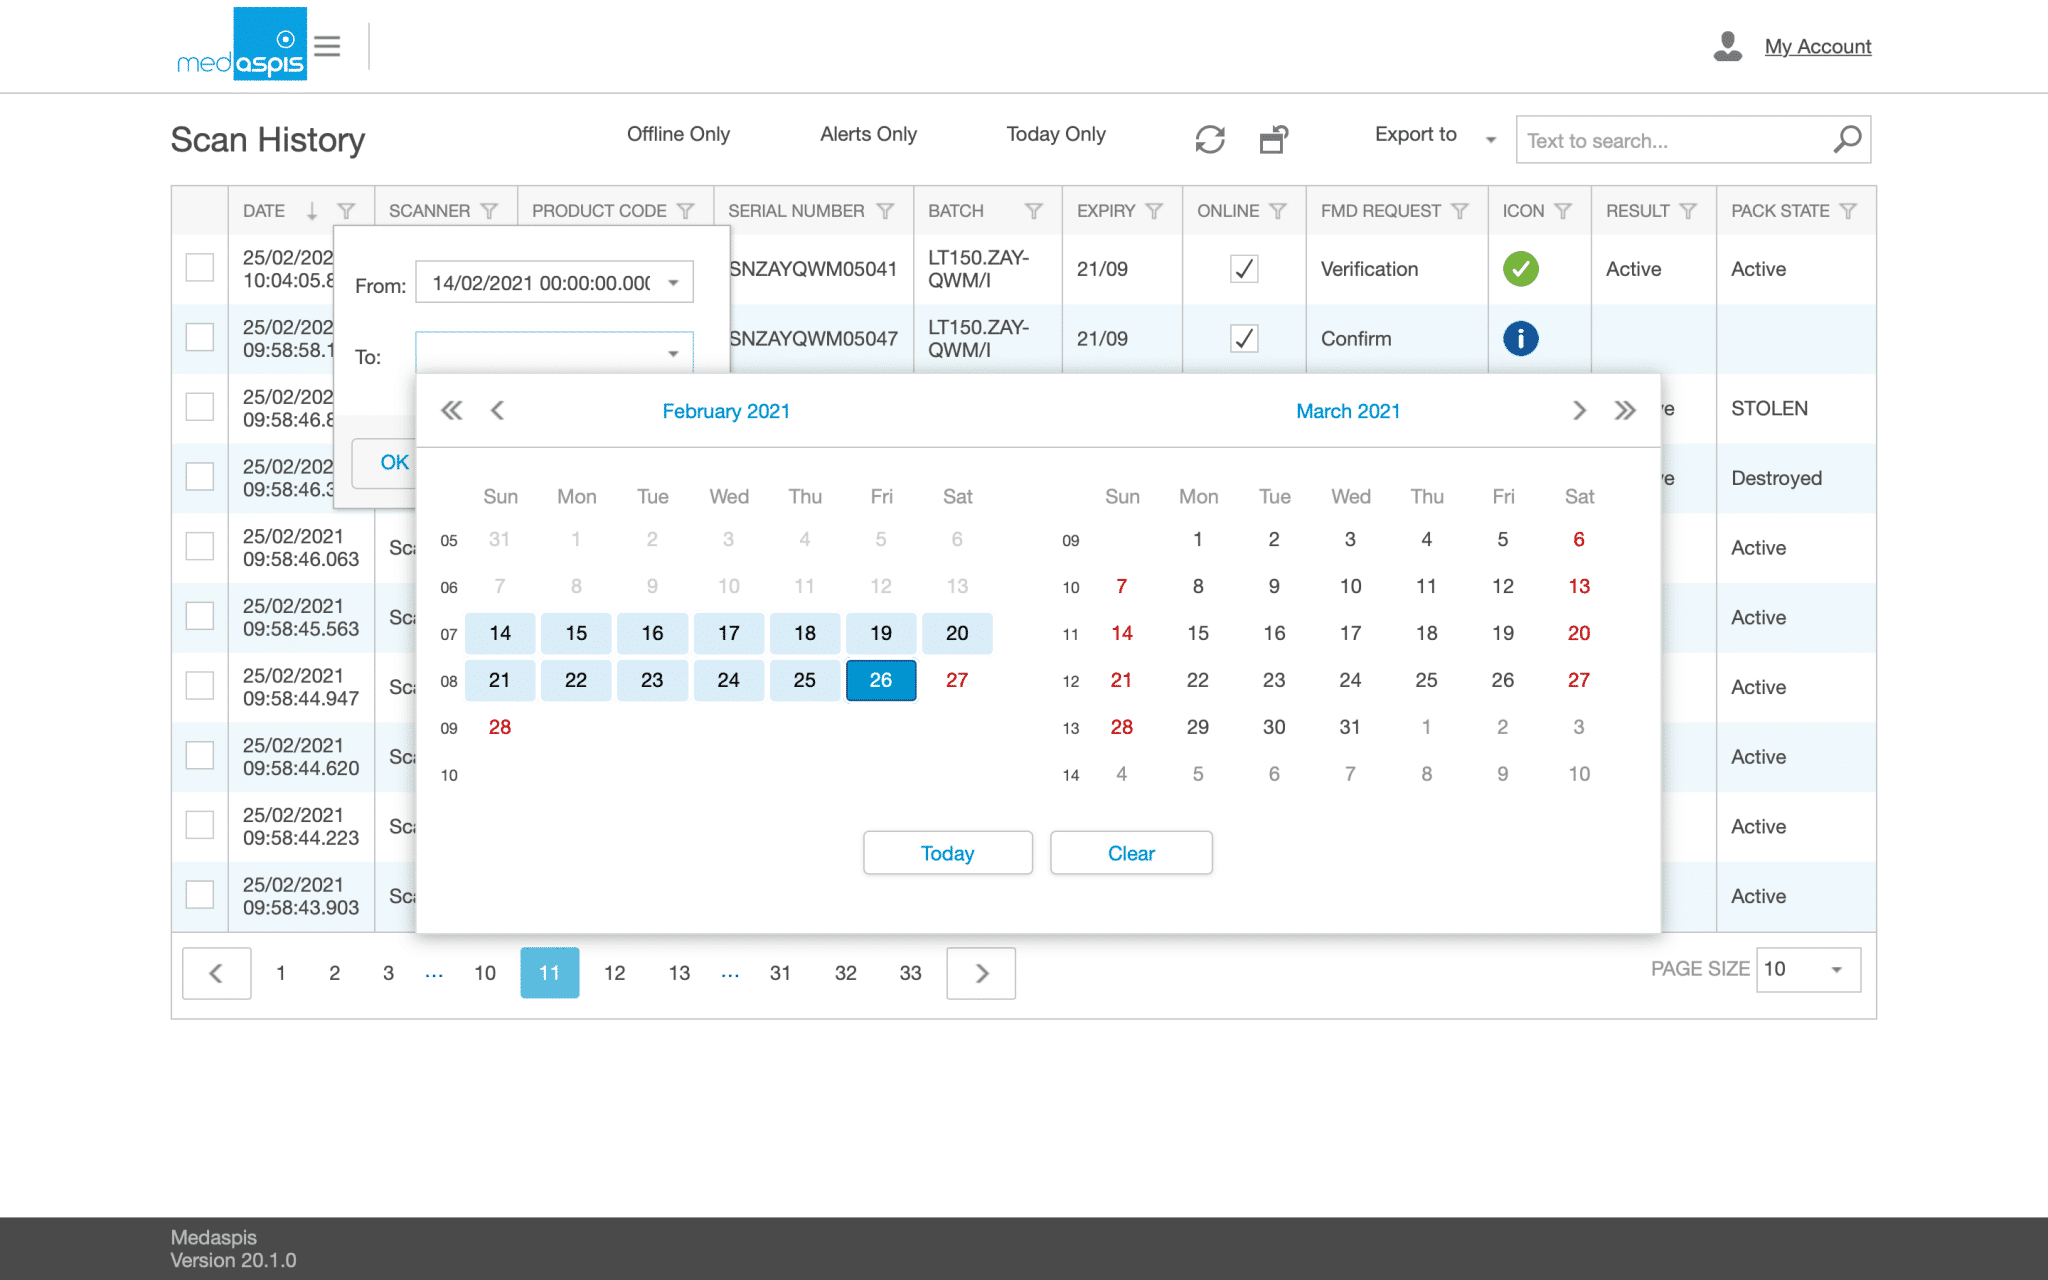
The wanted time period can be selected simply by changing the drop-down menu. The ‘No Date Filter’ setting displays all entries in the scan history. If you wish to use other time filters, you can filter by date in the date column at any time.
You can sort each individual column in the Scan History table by clicking on the relevant column header. The sort order is indicated by an arrow icon to the right of the column heading. Clicking again reverses the sort order.
The default setting is to sort by date. The most recent entry is displayed at the top.
The data sets can be filtered as required; all filters can be combined. Each column has a funnel icon next to its heading. Clicking on the funnel icon opens a window that allows you to filter the corresponding column.
The date range can be narrowed down using a start and end date. You can filter by a specific serial number, an expiry date, a pack status, etc.
You can clear any filters you have set by clicking on the ‘Clear’ button in the bottom right-hand corner of the screen.
Directly below the table headings, there is a search function for most columns. For some column contents, the options can be selected directly via a context menu that appears when you right-click.
It is possible to combine filters across different columns. The selected search filters are summarised in text form in the sub-row and can be edited by clicking on the filter text. Clicking on the word ‘clear’ will completely reset the filter at any time.
Please note: Only columns whose contents can be processed by the filter can be searched, sorted or filtered. Otherwise, the column search function is not available.
The selected and filtered data can be exported. All displayed parameters (displayed columns) and entries (displayed rows) can be exported from the system in CSV, XLSX and PDF formats. The data is made available via the browser’s download function.
If the number of records to be downloaded exceeds the system’s technical capacity, the export will not be carried out; instead, a brief message will appear stating this.
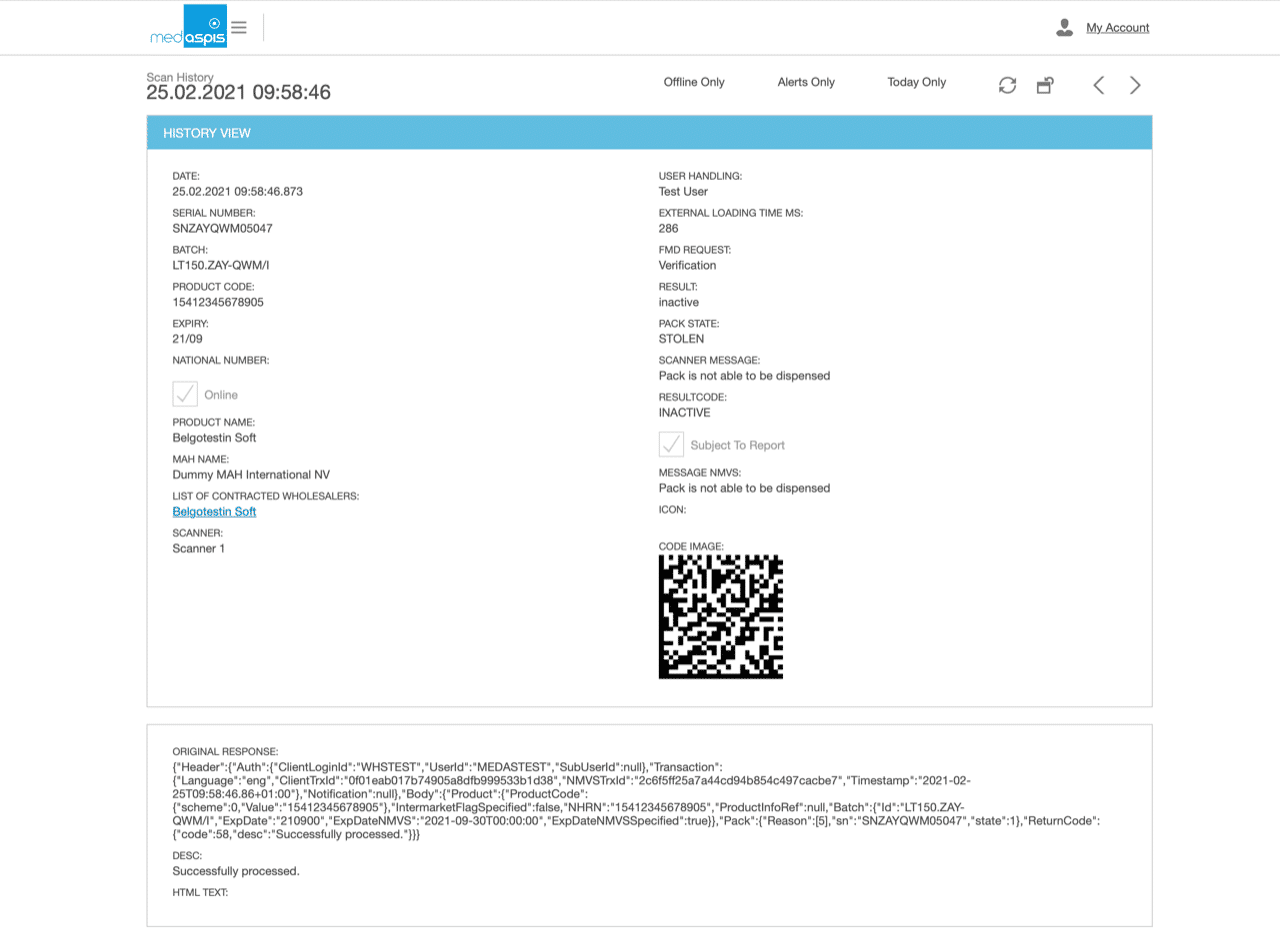
For each individual scan, you can view all additional information by clicking on the relevant row.
This additional information supplements the details shown in the Scan History. Of particular note is the code image. This 2D matrix code contains the data from the 2D matrix code on the scanned medicine pack. This code can be used if the pack needs to be scanned again (e.g. following an offline situation).
The ‘Original Response’ tile contains the text file generated by the NMVS during the check. If any discrepancies arise during a scan, you can check here to see how the NMVS responded to the transfer of the data record from the scan.
If specific information regarding alert handling is available for the scan, this will also be displayed on this page.
You can choose to display 10, 20, 50, 100 or 200 lines per page. You can adjust this setting using the drop-down menu at the bottom right.
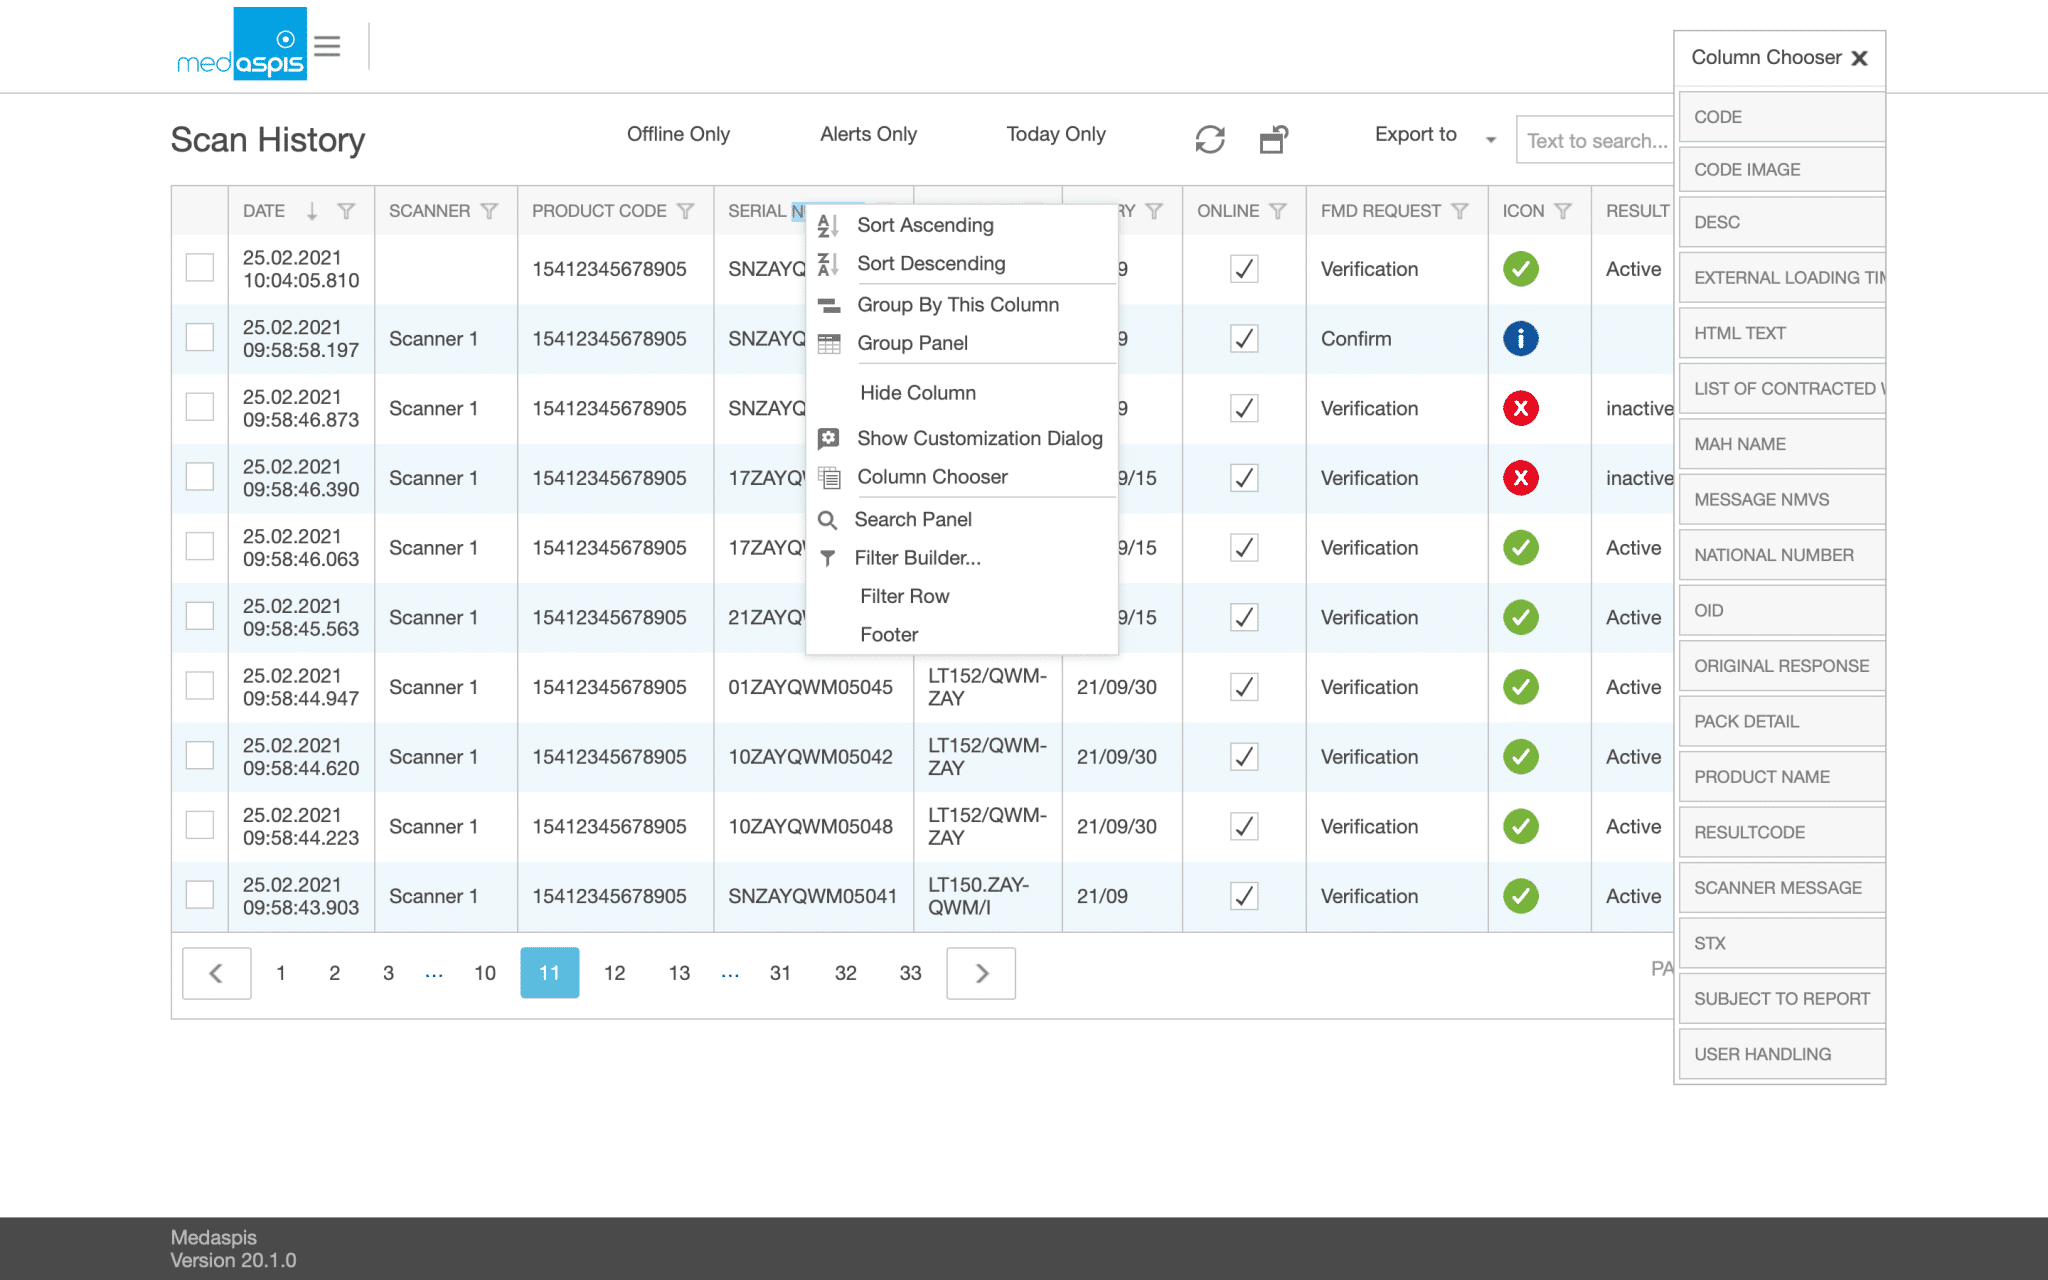
In the default view of the Scan History, all columns required for day-to-day FMD operations are displayed. Additional attributes can be displayed as required. Column visibility settings are saved and displayed permanently.
To change the display, right-click on the table header. A context-sensitive menu will open. Two menu items control the table view. ‘Hide Column’ removes a selected column from view. ‘Column Chooser’ opens an additional window displaying all parameters not currently shown. Drag the desired information onto the top of the table using the mouse. The selected parameter will then be displayed permanently in that position.
Using the context-sensitive menu, an additional blank line can be inserted below the displayed rows (menu option ‘Footer’). A blank line has now been created at the bottom, below the columns. A further context menu can now be accessed in any column of this blank line. In this menu, a counting function or the display of minimum or maximum values can be enabled.
Our support team is always there for you.
Please use a larger screen to view the full support menu.
Please allow up to 24 hours for your order to be processed. We will then send the newly generated Aggregation Codes as a PDF to the email address provided here.
Is your FMD Speed Scanner no longer working? To ensure you can continue working without interruption, we will send you a replacement device as quickly as possible. At the same time, you will receive a return label for sending back your defective device.
You will receive the replacement unit regardless of whether your warranty is still valid.
Do you suspect counterfeiting? Our medAspis Alert Team will assist you with the process. We are also happy to assist you with unclear error messages or unfamiliar situations.
Describe the incident using the report form. If needed, you can upload up to three photos. We will contact you as soon as possible and support you with the next steps.
Companies in the pharmaceutical industry are validated and meet strict quality requirements. Nevertheless, there is still a significant compliance risk with FMD.
Suspected falsification cases may not be handled and documented in a GxP-compliant manner.
With our free, anonymous and non-binding Compliance Check-up, we analyse and assess your company’s critical FMD error messages.
Based on your existing FMD audit trails, we analyse among other things:
The analysis is performed entirely within your data system. No data is transmitted to medAspis. All evaluations remain anonymous.
Download the error messages directly to your computer in your local language.
Can’t find your language? As soon as you become a customer, we’ll of course provide the error messages in your local language. Promise.
medAspis stands for proven quality and traceable processes. Lean FMD provides the necessary framework for this.
Lean FMD is validated in accordance with EU-GMP Annex 15. medAspis operates a Quality Management System in accordance with ISO 9001 and supports you with validation and the required documentation.
With the Validation Toolkit, you receive the documentation for the validation of Lean FMD. This enables you to carry out the necessary validation steps in a structured and traceable manner.

Download an excerpt from the Validation Toolkit to get a first impression of the structure and process of validation.
The complete toolkit contains all the necessary documents for validating Lean FMD.